Sunday, 18 December 2016

Animation - Blinking and Changing Color Effects of Text in vb.net

This tutorial will teach you how to create a program that has a blinking and changing color of the texts using vb.net.
Now, let's start this tutorial!
1. Let's start with creating a Windows Form Application for this tutorial by following the following steps in Microsoft Visual Studio: Go to File, click New Project, and choose Windows Application.
2. Next, add only one label named Label1 and one timer named Timer1.
3. Now, let's do the coding.
First, we will have to declare some variables that we will use.
                   Dim i As Integer = 0
                   Dim j As Integer
For our main code, we will prefer to code for the Tick Event of the timer. We will have the forecolor blue and red for our blinking effect and a moving text from right to left. Put any words also on the string
 Private Sub Timer1_Tick(ByVal sender As System.Object, ByVal e As System.EventArgs) Handles Timer1.Tick

        Dim str As String = "vowbme.blogspot.com"
        Dim c(str.Length) As Char
        c = str.ToCharArray
        If j = 0 Then
            DspLabel1.ForeColor = Color.Blue
            If i < str.Length Then
                DspLabel1.Text = DspLabel1.Text & c(i)
                i = i + 1
            Else
                i = 0
                DspLabel1.Text = ""
            End If
            j = 1
        Else
            j = 0
            DspLabel1.ForeColor = Color.Red
        End If
    End Sub

Lastly, we will code for the Form_Load. We will just start the timer here.
Private Sub Form1_Load(ByVal sender As System.Object, ByVal e As System.EventArgs) Handles MyBase.Load
        Timer1.Start()
    End Sub

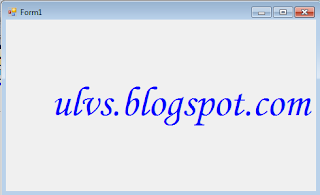
Output:
Animation: Bouncing Ball in Visual Basic

In this tutorial I’m going to teach you how to animate a ball by using Visual basic .The feature of the ball is that, it bounces in every side of the Form. With this, you will learn the functions of the bitmap and the graphics object.
Let’s begin:
Open the Visual Basic and create a New Windows Application. Add the timer and the Label which is the title of the Form.

Double click the Timer and do the following code above the Timer_Tick sub procedure for declaring all the variables that are needed.
Private b_Size As Integer = 10 'FRACTION OF BALL SIZE
    Private move_Size As Integer = 4 'FRACTION OF CLIENT AREA
    Private btmp As Bitmap
    Private b_PositionX As Integer
    Private b_PositionY As Integer
    Private b_RadiusX As Integer
    Private b_RadiusY As Integer
    Private b_MoveX As Integer
    Private b_MoveY As Integer
    Private b_BitmapWidth As Integer
    Private b_BitmapHeight As Integer
    Private bitmap_WidthMargin As Integer
    Private bitmap_HeightMargin As Integer

In the Timer_Tick Sub Procedure, do the following code for the movement of the ball.

 Private Sub Timer1_Tick(ByVal sender As System.Object, ByVal e As System.EventArgs) Handles Timer1.Tick

        'DECLARE A VARIABLE TO OBTAIN THE GRAPHICS OBJECT.
        Dim grafx As Graphics = CreateGraphics()
        'DRAW THE BALL IN THE FORM.
        grafx.DrawImage(btmp, _
            CInt(b_PositionX - b_BitmapWidth / 2), _
            CInt(b_PositionY - b_BitmapHeight / 2), _
            b_BitmapWidth, b_BitmapHeight)

        grafx.Dispose()

        'INCREAMENT THE POSITION OF THE BALL BY ITS DISTANCE TO MOVED BOTH X AND Y AXIS.
        b_PositionX += b_MoveX
        b_PositionY += b_MoveY

        'REVERSE THE DIRECTION OF THE BALL WHEN IT HITS TO THE BOUNDARY.
        If b_PositionX + b_RadiusX >= ClientSize.Width _
            Or b_PositionX - b_RadiusX <= 0 Then
            b_MoveX = -b_MoveX
            Beep()
        End If

        'SET THE Y BOUNDARY TO 90 SO THAT IT WILL NOT EXCEED TO THE TITLE OF THE FORM.
        If b_PositionY + b_RadiusY >= ClientSize.Height _
            Or b_PositionY - b_RadiusY <= 90 Then
            b_MoveY = -b_MoveY
            Beep()
        End If
    End Sub

Create a control class that overrides the OnResize method. OnResize increases the Resize event and it occurs when the control is resized.
Protected Overrides Sub OnResize(ByVal ev_arg As EventArgs)

        Dim grafx As Graphics = CreateGraphics()
        'ERASE ANY DRAWINGS.
        grafx.Clear(BackColor)

        'DECLARE A VARIBLE THAT HOLDS THE RADIUS OF THE BALL
        'THEN SET THE WIDTH OR THE HIEGHT OF IT TO A FRACTION WHICHEVER IS LESS TO THE CLIENT AREA.
        Dim dbl_Radius As Double = Math.Min(ClientSize.Width / grafx.DpiX, _
            ClientSize.Height / grafx.DpiY) / b_Size


        'SET THE HIEGHT AND WIDTH OF THE BALL.
        b_RadiusX = CInt(dbl_Radius * grafx.DpiX)
        b_RadiusY = CInt(dbl_Radius * grafx.DpiY)

        grafx.Dispose()
        'SET THE DISTANCE THAT THE BALL MOVES INTO 1 PIXEL OR THE BALL SIZE WHICHEVER IS GREATER. 
        'THIS MEANS THAT THE DISTANCE OF THE BALL MOVES EACH TIME IS PROPORTIONAL TO ITS SIZE, 
        'WHICH IS ALSO PROPORTIONAL TO THE SIZE OF THE CLIENT AREA.
        'THE BALL SLOWS DOWN WHENEVER THE CLIENT AREA IS SHRUNK
        'AND THE BALL SPEEDS UP WHEN IT IS INCREASED.
        b_MoveX = CInt(Math.Max(1, b_RadiusX / move_Size))
        b_MoveY = CInt(Math.Max(1, b_RadiusY / move_Size))

        'THE VALUE OF THE BALL'S MOVEMENT SERVES AS THE MARGIN AROUND THE BALL, 
        'THAT DETERMINES THE ACTUAL SIZE OF BITMAP ON WHICH THE BALL IS DRAWN.
        'THE DISTANCE OF THE BALL MOVES IS EQUAL TO THE SIZE OF THE BITMAP, 
        'WHICH ALLOWS THE PREVIOUS BALL'S IMAGE TO BE ERASED BEFORE THE NEXT IMAGE IS DRAWN.
        bitmap_WidthMargin = b_MoveX
        bitmap_HeightMargin = b_MoveY

        'TO FIND OUT THE ACTUAL SIZE OF THE BITMAP ON WHICH THE BALL IS DRAWN 
        'PLUS THE MARGINS TO THE BALL'S DIMENSIONS.
        b_BitmapWidth = 2 * (b_RadiusX + bitmap_WidthMargin)
        b_BitmapHeight = 2 * (b_RadiusY + bitmap_HeightMargin)

        'CREATE A NEW WIDTH AND HEIGHT OF THE BITMAP.
        btmp = New Bitmap(b_BitmapWidth, b_BitmapHeight)

        'OBTAIN THE GRAFPHICS OBJECT SHOWN BY THE BITMAP.
        grafx = Graphics.FromImage(btmp)

        'CLEAR THE EXISTING BALL AND DRAW A NEW BALL.
        With grafx
            .Clear(BackColor)
            .FillEllipse(Brushes.Black, New Rectangle(b_MoveX, _
                b_MoveY, 2 * b_RadiusX, 2 * b_RadiusY))
            .Dispose()
        End With
        'RESET THE POSITION OF THE BALL TO THE CENTER OF THE CLIENT AREA.
        b_PositionX = CInt(ClientSize.Width / 2)
        b_PositionY = CInt(ClientSize.Height / 2)
    End Sub

After that, go back to the Design Views ,double click the Form and do the following code for starting the timer.
  Private Sub Form1_Load(ByVal sender As System.Object, ByVal e As System.EventArgs) Handles MyBase.Load
        Timer1.Start()
    End Sub


Output:

Graphics for Visual Basic

Conceptual Differences


In Visual Basic 6.0, graphics methods apply only to the Form object and to the PictureBox control.
In Visual Basic 2008, graphics methods apply to forms, plus any control that supports the Paint event, including the PictureBox, Panel, and GroupBox controls. Additionally, graphics methods apply to any controls that support the OwnerDraw property, including theListView, TreeView, and Button controls.

AutoRedraw Property

In Visual Basic 6.0, graphics methods can be called from any event procedure; the AutoRedraw property is used to persist graphics when graphics methods are called from an event other than the Paint event.
In Visual Basic 2008, graphics methods should only be called from the Paint event procedure, or in the case of some owner-drawn controls, from the various Draw event procedures (DrawItem, DrawSubItem, etc.). The AutoRedraw property is no longer supported and is not necessary because the Paint and Draw events automatically persist graphics.

ClipControls Property

In Visual Basic 6.0, the ClipControls property is used to control the painting of a form or control. When set to True, only newly exposed areas are repainted, in theory, improving performance.
There is no equivalent for the ClipControls property in Visual Basic 2008; performance enhancements in GDI+ and up-to-date video adapters make it unnecessary.

DrawMode Property

In Visual Basic 6.0, the DrawMode property controls the color of a graphics object when drawing one pattern on top of another. This property only affects monochrome or low-resolution displays (256 colors or less).
There is no equivalent for the DrawMode property in Visual Basic 2008; it is no longer necessary with current displays.

DrawStyle Property

In Visual Basic 6.0, the DrawStyle property controls the appearance of a line drawn using the Line method. If the DrawWidth property is set to a value greater than 1, the DrawStyle property has no effect and the line will always be solid.
In Visual Basic 2008, the appearance of a line is controlled by setting the DashStyle property of a System.Drawing.Pen class used by one of the DrawLine methods; line width has no bearing on this property.

DrawWidth Property

In Visual Basic 6.0, the DrawWidth property determines the thickness of a line in pixels; the DrawWidth property is typically set before performing a graphics method.
In Visual Basic 2008, the Pen.Width property of a System.Drawing.Pen control determines line thickness; you can set the Widthproperty as a parameter when you create the Pen, or by setting Pen.Width after the Pen is created. If no Pen.Width property is specified, the default is 1 pixel.

Image Property

In Visual Basic 6.0 the Image property of a form or PictureBox control returns a handle to a bitmap; the handle can be assigned to thePicture property or used as a value to pass to Windows API calls.
In Visual Basic 2008, bitmaps no longer have handles; the actual bitmap itself is passed as an object of type Bitmap. A Bitmap control can be assigned to the Image property of a PictureBox control, but it cannot be passed to Windows API calls.

Line Method

In Visual Basic 6.0, the Line method is used to draw a rectangle by specifying the top left and lower coordinates, along with an optional argument B. The FillColor property is used to fill a rectangle with a solid color, and the FillStyle property fills the rectangle with a crosshatch pattern.
In Visual Basic 2008, the DrawRectangles method is used to draw the border of a rectangle, and the FillRectangle method is used to fill it. FillRectangle takes a Brush object as a parameter. The SolidBrush replaces the FillColor property and members of the HatchBrushclass replace the FillStyle property.

Point Method

In Visual Basic 6.0, the Point method of a form or PictureBox control is used to return a color value for the pixel at a specified point. Although the Point method can be used for forms or controls that do not contain a picture, it is most often used to retrieve a color from a bitmap assigned to the Picture property.
In Visual Basic 2008, the Point method no longer exists. You can use theM:System.Drawing.Bitmap.GetPixel(System.Int32,System.Int32) method to retrieve a color value from a bitmap. For forms or controls that do not contain a picture, you can query the BackColor property.

Print Method

In Visual Basic 6.0, the Print method is used to display text on a form or PictureBox control. The font used to display the text is determined by the Font properties of the form or control, and the color is determined by the ForeColor property. The Print method offers no control for the location of the text and can only display text horizontally.
In Visual Basic 2008, the DrawString method is used to display text. The font is determined by a Font object, and the color is determined by a Brush object; both are passed as parameters to the DrawString method. The DrawString method also has X and Yparameters that determine the starting location for the text. There is also an optional Format parameter that takes a StringFormat object, allowing you to display text vertically.

PSet Method

In Visual Basic 6.0, the PSet method is used to change the color of a pixel on a form or PictureBox control. If the DrawWidth property is set to a value greater than 1, the PSet method draws a filled circle. An optional parameter is used to specify the color; if omittedForeColor is used.
In Visual Basic 2008, there is no equivalent for the PSet method. To change the color of a single pixel on a form or the PictureBoxcontrol, use the DrawEllipse method to draw a circle with a height and width of 1 pixel. To duplicate the functionality of PSet whenDrawWidth is greater than 1, use the FillEllipse method.

Code for Change shape of Ellipse

  Protected Overrides Sub OnPaint(ByVal e As System.Windows.Forms.PaintEventArgs)
        Dim shape As New System.Drawing.Drawing2D.GraphicsPath
        shape.AddEllipse(0, 0, Me.Width, Me.Height)
        Me.Region = New System.Drawing.Region(shape)
    End Sub

Code for Change shape of Bezier

    Protected Overrides Sub OnPaint(ByVal e As System.Windows.Forms.PaintEventArgs)
        Dim shape As New System.Drawing.Drawing2D.GraphicsPath
        shape.AddBezier(0, 0, 67, 545, 443, 23, 23, 23)
        Me.Region = New System.Drawing.Region(shape)
    End Sub


Animated Text in Visual Basic 2010

Today, I will teach you how to animate a text by using Visual Basic 2008. With this, you don’t need to drag any Label in the Form. It is because, the codes will be the one to make a text that will be appear in the Form.
So let’s begin:
Open Visual Basic 2010, create a new Windows Application. And drag a Timer in the Form.

Note: Put this code for the imports
                      Imports System.Drawing.Drawing2D
                      Imports System.Drawing.Text
After that, double click the Timer and do the following code above the Timer_Ticksub procedure for declaring the variables that are needed.
                    Const timer_interval As Integer = 15 ' INTERVAL IN MILLISECONDS
                    Protected current_gradient_shift As Integer = 10
                    Protected gradiant_step As Integer = 5
In the Timer_Tick sub procedure, do the following code for the animation.
Private Sub Timer_Tick(ByVal obj As Object, ByVal ea As EventArgs) Handles Timer1.Tick
        'SET THE GRAPHICS OBJECT IN THE FORM
        Dim grafx As Graphics = CreateGraphics()

        'SET AND DETERMINE THE SIZE,FONT AND TEXT.
        Dim fnt As New Font("Segoe UI", 60, _
            FontStyle.Regular, GraphicsUnit.World)
        Dim start_text As String = "Text Animation" 'APPEAR THE TEXT IN THE FIRST LOAD
        Dim fnt_size As New SizeF(grafx.MeasureString(start_text, fnt))

        'SET THE TEXT THAT TO BE CENTERED IN THE CLIENT AREA.
        Dim ptf_text_start As New PointF( _
            CSng(ClientSize.Width - fnt_size.Width) / 2, _
           CSng(ClientSize.Height - fnt_size.Height) / 2)


        'FOR THE ANIMATION EFFECT, SET THE GRADIENT START AND ITS END POINT.
        Dim ptf_gradient_start As New PointF(0, 0)
        Dim ptf_gradient_end As New PointF(current_gradient_shift, 130)


        'USE THE BRUSH FOR DRAWING THE TEXT.
        Dim gradient_brush As New LinearGradientBrush(ptf_gradient_start, _
            ptf_gradient_end, Color.Chocolate, BackColor)

        'THE TEXT DRAW AT THE CENTERED OF THE CLIENT AREA.
        grafx.DrawString(start_text, fnt, gradient_brush, ptf_text_start)
        grafx.Dispose()

        'REVERSING THE GRADIENT WHEN IT GETS TO A CERTAIN VALUE
        current_gradient_shift += gradiant_step
        If current_gradient_shift = 500 Then
            gradiant_step = -5
        ElseIf current_gradient_shift = -50 Then
            gradiant_step = 5
        End If

    End Sub
Then, go back to the design views, double click the Form and do the following code for starting the Time and to start the animation on the first load.
  Private Sub Form1_Load(ByVal sender As System.Object, ByVal e As System.EventArgs) Handles MyBase.Load
        Timer1.Start()
        Timer1.Interval = timer_interval
    End Sub
A Code that will be appear in the following:

Output: